Sponsor

Wednesday 13 June 2018

How to download Facebook videos

FACEBOOK has become one of the most popular social media platforms with more than two billion users from all over the world and thousands of new signing up every day.


Facebook is mainly used to create new friends, connect with existing friends, share messages, videos, pictures and other useful information. It offers a convenient platform for its users to expand their social network.

The site is also used by businesses to convey their messages to their target customers conveniently.

One of the most interesting features about Facebook is the amount of online content available on the platform including interesting pictures, videos and messages. Downloading pictures from Facebook is very easy, but you might struggle while downloading videos.

If there are certain videos that you find interesting and want to download but are unable to do so, then you must follow the steps mentioned below to download your favourite Facebook videos on your computer.

Pre-requisites: You must have a desktop computer with a stable internet connection and Chrome installed on it.

1. Open your Google Chrome and go to the app store.

2. Here you need to search for “Facebook Video Downloader” and install the extension to your chrome by clicking on “Add to Chrome” button.

3. You will receive a prompt on your screen to confirm the installation. Click on the “Add” button.

4. After the installation is complete, you shall be able to see the Facebook icon towards the top right corner of your browser screen.

5. Now log-in to your Facebook account and find out the video you want to download.

6. Play the video and while it is playing click on the Facebook icon on your browser.

7. This will open up a small window, and you must select the quality of video you want to download such as SD or HD and also select the location you want to save the video on your PC.

8. The video will be downloaded on your PC, and you can watch it even without an internet connection anytime you want.

Please note that not all videos from Facebook are available for download.

It is up to the video owner if he/she wants to allow its download. If the video is available for download, you must be able to see a globe icon on the page where the video is posted otherwise you will see a lock icon if the video is not available for download.


Enter your email address:

Delivered by FeedBurner

Read More »

How to pause and clear your YouTube history

YOUTUBE is one of the most popular online video streaming platforms that host a wide range of videos belonging to various genres.


YouTube videos are watched by users from all over the world belonging to different age groups. One of the standard features of YouTube is that every time you search for a particular video, it saves that in your search history.

Similarly, every time you watch a video, it is saved in your watch history. If you hand over your device to anyone, then they can quickly check your YouTube history.

This might cause you a lot of embarrassment as you might have watched some videos that you did not think others would know about.

If you feel that this scenario can cause you some discomfort, it is better to delete your YouTube history and be at peace every time you hand over your smartphone to someone else. Here is a step-by-step guide to help you pause and clear your YouTube history.

How to pause YouTube history

1. Open the YouTube App on your smartphone and tap on the icon/avatar located towards the right top corner.

2. This will open a new menu, now press the settings option.

3. Thereafter, select the option “History and Privacy”.

4. Now, tap on the option “Pause watch history” and turn the toggle option to off.

5. Now press the return key and on the previous menu tap on the option “Pause search history” and turn the toggle option to off.

6. Now your YouTube history is paused and will remain so until you turn it back on.

How to clear your YouTube history

1. Open the YouTube App on your smartphone and tap on the icon/avatar located towards the right top corner.

2. This will open a new menu, now press the settings option.


3. Thereafter, select the option “History and Privacy”.

4. Now, tap on the option “Clear watch history”, and a confirmation screen will open. If you really want to clear your entire watch history, press on “Clear watch history” and your entire watch history would be clear, and you will be able to see a small confirmation notification on your screen.

5. Now press the return key and on the previous menu tap on the option “Clear search history”. If you really want to clear your entire search history, press on “Clear search history” and your entire search history would be clear, and you will be able to see a small confirmation notification on your screen.

By following these simple steps, you can ensure that nobody is able to access your YouTube history without your consent.


Enter your email address:

Delivered by FeedBurner

Read More »

How to use Gmail offline

Gmail is one of the most popular email clients at present, with millions of subscribers using it for their personal as well as business-related purpose.


Earlier, it was not possible to use Gmail offline to read and compose messages, but now Google has finally enabled the option to use Gmail offline.

This allows the users to sync messages, compose new messages and read messages even if the device is not connected to the internet.

This feature is expected to enhance the productivity of those users who had to access their Gmail on the go or at locations where there is not a reliable internet connection.

If you have not enabled the offline mode in your Gmail till now, then here is the step by step guide to help you set up the offline mode in Gmail using the desktop website:

Classic Gmail-

If you are using the classic Gmail and have not upgraded to the latest version, then you shall follow the below mentioned steps to use Gmail offline:

1. Log-on to the Chrome Store and download the “Gmail Offline App”.

2. Now press on the option “Add to Chrome” and follow the on-screen instructions. Afterwards, select the app from the list of shortcuts.

3. Thereafter you must select the option “Allow offline mail” and then press on “Continue”.

4. Now, you can access your Gmail offline by opening the app from the Chrome Store.

5. Now, you must press the settings option towards the top right corner and set the option for how many messages you want to download.

6. Gmail offline is not set up, and you can use it for all essential functions. But you must remember that you can access the Gmail offline app from within Chrome only.

New Gmail-

If you are using the new Gmail, then you must follow the steps mentioned below to activate the Gmail offline option:

1. Open your Gmail account in a new tab on Chrome.

2. Now, click on the gear option and thereafter select the settings menu.

3. Under General tab select the “Offline” option and enable it.

4. Now you must select the duration for which you need the offline mails (30,60 or 90 days) and also if you need the attachments offline.

5. You can also set the option to store the mails on your PC for convenient access, but this option could lead to vulnerability of your messages. Now save the changes and your offline Gmail is ready to use.

Being able to use Gmail offline is a handy option if you need to access your mail regularly but do not have a stable internet connection.


Enter your email address:


Delivered by FeedBurner
Read More »

Saturday 11 March 2017

How To Get New Traffic To Old Posts

how to get new traffic to old posts

Often a new post gains a high spike in interest when first posted. This is commonly due to promotion on social media and general timeliness of the content. After time, this attention drops off. Good posts should not be forgotten and can still be used to drive traffic.

Old But Not Forgotten

The following 10 tips may help you attract attention to your older blog posts.

1) Remember the footer: Add a footer on all new posts to older (relevant) posts. The “You might also enjoy reading this” WordPress widget can do this automatically.

2) Add links: Add a menu bar or column that includes links to older/archived articles. This includes using sitemaps, archives and tag clouds.

3) Use categories: Ensure posts have tags and categories.

4) References: Reference older posts in new posts. For example: Back in 2010 I wrote about XYZ…

5) Create a series: Many older posts can easily gel together with newer ones.

6) Updates: Add updates to older posts. A simple “Updated (Date)” with a couple of words at the top of an older post may bring attract visitors.

7) Advertise: Share older post links on other social media site you use. In forums and community sites members may ask for advice that your older blog posts can answer.

8) Avoid Repetition: Avoid reposting older posts verbatim. This may damage your search engine rankings.

9) Analytics: Study your analytics. Discover how your visitors land on your blog and exploit these “doorways”. Remember that not all visitors will first land on your index/front page.

10) Other mediums: Utilise other communication methods to promote older posts. If you have a regular email newsletter, consider adding links to older posts in these messages.

Did these work for you? Have you got some suggestions? Leave us a comment!

Enter your email address:


Delivered by FeedBurner
Read More »

Friday 3 March 2017

Huawei P10 plus Release Date, Price And Specs

THE HUAWEI P10 PLUS DESCRIPTION

The Huawei P10 Plus comes with a 5.5-inch dual-curved screen with a 1440 x 2560 resolution; the home grown Kirin 960 SoC is under the hood with an octa-core 2.3GHz CPU, and the Mali-G71 GPU. A 6GB of RAM and 128GB of native storage, a dual sensor main camera (20-megapixel monocrome and 12-megapixel color) and an 8-megapixel selfie unit with F/1.9 aperture.

Huawei p10 plus
Photo credits: phonearena

DESIGN

Device Type: Smart phone
OS: Android (7.0), Emotion UI
Dimensions: 6.04 x 2.92 x 0.27 inches (153.5 x 74.2 x 6.98)
Weight: 5.82 oz (165 g)
Materials: Main body: Aluminum
Features: Fingerprint (touch)
Colors: Black, Gold, Silver, Pink, Green, Blue

DISPLAY

Personal Size: 5.5 inches
Resolution: 1440 x 2560 pixels
Pixel Density: 534 ppi
Technology: IPS LCD
Screen-to-body-ratio: 73.29 %
Features: Scratch-resistant glass (Corning Gorilla Glass 5), Light sensor, Proximity sensor

CAMERA

Camera: 12 megapixels
Flash: Dual LED
Aperture Size: F1.8
Hardware Features: Dual-camera (20-megapixel), Optical image stabilization, Autofocus (Phase detection, Laser)
Software Features: Touch to focus, Smile detection, Face detection, Self-timer, Digital zoom, Geo tagging
Settings: Exposure compensation, ISO control, White balance presets, Shutter speed control
Shooting Modes: Burst mode, High Dynamic Range mode (HDR), Panorama, Macro mode, Effects
Camcorder features:3840x2160 (4K) Video calling, Video sharing
Front facing camera: 8 megapixels

HARDWARE

System chip: HiSilicon Kirin 960
Graphics Processor: Octa-core, 2300 MHz, ARM Cortex-A73 and ARM Cortex-A53, 64-bit
Graphics processor: Mali-G71 MP8
System memory: 6 GB RAM
Built-in storage: 128 GB
Storage Expansion: microSD, microSDHC, microSDXC up to 256 GB

BATTERY

Capacity: 3750 mAh
Type: Not user replaceable

MULTIMEDIA

Mirroring: Wireless screen share

Music Player:
Filter by:Album, Artist, Genre, Playlists
features: Album art cover, Background playback
Loudspeakers: Earpiece, Loudspeaker

GSM: 850, 900, 1800, 1900 MHz
UMTS: 800, 850, 900, 1700/2100, 1900, 2100 MHz
LTE (FDD): Bands 1, 2, 3, 4, 5, 7, 8, 9, 12, 17, 18, 19, 20, 26, 28, 29
LTE (TDD): Bands 38, 39, 40, 41
Data:LTE-A, HSPA
Nano Sim: Yes
Multiple Sim cards: 2 slots, Shared with microSD

PHONE FEATURES

Sensors: Accelerometer, Gyroscope, Compass, Hall Notifications: Haptic feedback
Other Features: Voice dialing, Voice commands, Voice recording

CONNECTIVITY

Bluetooth: 4.2
Wi-Fi: 802.11 a, b, g, n, ac, dual- band
Mobile hotspot: Yes
USB: USB 2.0
Connector: USB Type-C (reversible)
FeaturesMass storage device, USB charging
Positioning: GPS, A-GPS, Glonass, BeiDou
Navigation: Turn-by-turn navigation, Voice navigation
Other: NFC, Infrared, Tethering, Computer sync, OTA sync

AVAILABILITY

Officially Announced: 26 Feb 2017
Scheduled release:March 2017

SHOPPING INFORMATION

MSRP price: € 799

PROS
+ High screen-to-body ratio (73.29 %)
+ Big display (5.5 inches)
+ Thin body, measuring less than
7.5mm/0.3inches (0.27 inches)
+ Extremely high pixel density screen (534 ppi)
+ Lots of RAM (6 GB RAM)
+ Dual SIM card support

CONS
No cons

Inasmuch as we put more efforts to provide correct Huawei P10 Plus specifications, there's always a possibility of making mistakes. If you see any wrong or incomplete data, let us know by using the comment box belie.

Enter your email address:


Delivered by FeedBurner
Read More »

Tuesday 28 February 2017

Top 5 Bluetooth Transfer Apps For Your Android Phone

Bluetooth transfer apps

Android phones as we all know is popular in the global market and also among youngsters simply because they are cheaper in price compared to iOS phones. Android phones are mostly used this days because of its awesome features such as Large RAM, large storage, IPS HD display, full touch support, high quality camera, fast internet, High speed CPU's and easy to use interface. Latest abdtoid phone storage can be expanded with the help of memory card (SD card). Sometimes we need to large files that is based on our ibterst or transfer games with large size, etc. As android users, we either have the option to either use the WiFi direct feature or to use Bluetooth transfer. We all know that Bluetooth transfer speed is very low. However, for the sake of those using the older version of android that does not support WiFi direct feature, you can download any of the Bluetooth transfer apps For your android phones to download apps from one android phone to the other easily.

List Of Top 5 Bluetooth Transfer Apps For Android To Transfer Data


1. Bluetooth File Transfer.
Bluetooth file transfer is one of the popular Android Bluetooth file transfer App which is available on Google play store for free. We can manage our phone files using its files manager. Using this App we can select multiple files to send. It uses the FTP protocol to transfer the files. It is compatible with all the Android versions. You can also view the received file using this App. Approximately 10 million people have installed this App.
Download Bluetooth File Transfer on Google playstore

2. Bluetooth File Share.

bluetooth file share
Bluetooth file share is another popular Android Bluetooth file sharing App. It is also available on Google play store for free. It can be used to share Audio, video, photos, apps etc. This app also arrange all the files category wise. We can also share Application via social media like Gmail, FB etc. It can also backup the application installed on our phone. It can also share contacts and provide support for dropbox. Approximately 500,000 people have installed this App.
Download Bluetooth File Share on Google playstore

3. Bluetooth App Sender.
bluetooth app sender
Bluetooth App sender is specially designed to send our installed App and apk files with the help of Bluetooth. It is available on Google Playstore for free. It also allow you to Backup your Apps. Bluetooth App Sender also allows you to share your apps to social networking sites like Gmail and Facebook. It is a light weight App which provide easy to use interface. Approximately 1 million people have installed this App.
Download Bluetooth App Sender on Google playstore

4. Bluetooth Share File.
bluetooth share file
It is another high rated app in the list of best Bluetooth file transfer apps for android. It has a rating of 4.5 on Google play store. We can easily share audio, video, image, doc, and zip files using this app with our friends. It also provide inbuilt image browser. We can also share file using social media. We can switch on the bluetooth from inside the App. Approximately 50 thousand people have installed this App.
Download Bluetooth Share File on Goggle Playstore

5. App Sender Bluetooth.
app sender bluetooth
It is another best Android app for sharing our installed apps with our friends without using internet. We xan easily share our installed app with bluetooth or other options like Email, Dropbox, FB etc.It has a rating of 4.1 on Google Play Store. We can also uninstall an app from this App. It require Android 2.3 or higher version. Approximately 50 thousand people have installed this App.
Download App Sender Bluetooth on Google Play Store

Conclusion:
The above given are few best Bluetooth apps for android to transfer files. We hope you like them all don’t forget to share it with others. For any questions, write a comment below

Enter your email address:


Delivered by FeedBurner
Read More »

Friday 24 February 2017

Using Your Picture To Make Emoticons? Checkout


Technology develops deep and deep daily. Technology as we all know has done more good to us than bad. Though it makes some to be lazy but it can't stop the existence of what technology has brought to us or rather should I say to what technology is bringing to us.

After high imploration from the public, Android has finally bring out an alternative way to produce a custom emoticons"emoji". This was made possible because of the public request for it because sometimes there are still time when you can find the ideal emoticon to make known of yourself. Rather than waiting for Android to install that to you in the next emoticon update - it's high time you produce your own emoticon without anyone providing you with what is not real.

Thus, you can use any image you want - even if it's camera images or downloaded images. This emoticons can also be shared on any social media with your friends. In no wasting of your time, let's get started.

how to make emoticons using your picture

HERE'S HOW TO USE EMOJI MAKER
Firstly, Download and install emoji maker on your phone, its totally free!

• Having installed the app on your Android device, launch the app.

• At the first page of the app, you'll see "New emoji, popular, my emojis, stitch emojis and accessories emojis".

• Click on the and start with your
editing.

• Having clicked on the New emoji to create your own emojis - there are some other tools provided for you to make a custom emoji even without your own picture"downloaded or camera".

• Now you can make use of those tools to create both custom and your image emojis but to create emoji with your picture - click on the one that looks like a cropping tool.

how to make emoticons using your picture

• Click on the circled plus icon to select image from your gallery. Before proceeding, you must select the shape you want it to be in form of - weather it's human form or square etc. After that click on the icon that looks like a photo album so as to select picture from your gallery.

how to make emoticons using your picture

• Next is to begin with how you want the emoticon to be.

• Two fingers can be used in editing the emoticon. However you can increase or decrease the size of a tool you selected by holding two fingers on the screen and expand or reduce your fingers.

Probably, it is not a must that the image you used must lime with the cropping style. Sometimes it might be odd images but you can still design it even if it's odd.

how to make emoticons using your picture

With the use of two fingers on your screen you can as well rotate the emoticon tool and place it in the right order. This emoji maker app also contain some custom gif animated images "if you wish to use gif animated images".

Making custom emojis using your photo or downloaded photo makes chatting more sweet than you can ever imagine. Being able to show your friends your feelings through emojis can make it more understandable for them and also more easier for you to express your feelings.

Thats all.
If you want more updates like this to come your way, please subscribe to our newsletter!


Enter your email address:


Delivered by FeedBurner
Read More »

5 reasons to buy the Samsung Galaxy A3 (2017)

samsung galaxy a3

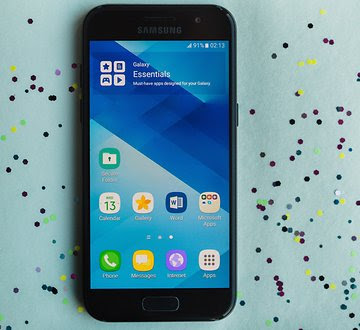
The Samsung Galaxy A3 (2017) is a great mid range device. Samsung hasn’t managed to avoid all faults with this phone but it without a doubt includes a range of functions and features that definitely play in its favor. Here are 5 reasons to opt for the Galaxy A3 (2017).

Before revealing the strengths of this device, it’s important to acknowledge its weaknesses. This way you can ensure that, as a potential buyer, your final decision is based on all the facts from both sides of the coin. The phone was released with Android 6.0.1, an Android interface that has now been available for several months. Samsung didn’t consider it necessary to install Android Nougat on the device, which reflects the fragmentation problem that affects the various Android versions.

Some also criticize the device’s poor internal memory (16 GB), as photography enthusiasts and/or multimedia fans will quickly use up the available space. While it is possible to use a microSD card, we shouldn't place such high expectations on a mid-range device. That said, this sector of the market is evolving and Samsung must move along with it otherwise it will loose out to other manufacturers that are likely to take the lead. One final downside: the price is still quite high, even when you consider all the device’s advantages.

1. It's waterproof
The waterproof feature often seems to be reserved for top-range devices, especially at Samsung. Luckily, things have changed this year because Samsung has decided to make its A3 and A5 models waterproof. Both devices have an IP68 certification, just the same as that which was given to their big brother: the Samsung Galaxy S7.

This certification means they are protected against water and dust. Not only can you use your device in the rain but you can submerge it in water up to 1.5 meters deep for a maximum duration of 30 minutes. Sounds too good to be true?

2. It's compact in size
This is probably the smartphone’s main selling point. While the current trend is for manufacturers to produce devices with larger screens (to such an extent that foldable screen technology is now being developed), some users still remain loyal to screens measuring less than 5 inches. Unfortunately, relatively few manufacturers are producing high-quality devices with a small screen. In the top-range domain, there are hardly any and in the mid range market, Sony is the only one: Sony Xperia Z5 Compact (former top-range Sony) and Sony Xperia X Compact.

The new Samsung Galaxy A3 has the advantage of being less expensive than the Sony Xperia X Compact and is also waterproof, a concept that Sony abandoned with its X Compact. With a 4.7-inch screen, the A3 2017 will delight all compact screen enthusiasts.

samsung galaxy a3

3. It has good battery life
Last year, one of the A3’s main strengths was its battery life. This year, again, the phone doesn’t let its users down. That said, it's important to point out that Samsung does everything it can to optimize the device: the slight improvements in capacity compared to the previous model (from 2,300 to 2,350 mAh) and the simple HD definition (720 x 1,280) enable these excellent results.

"The slight improvements in capacity compared to the previous model and the simple HD definition enable these excellent results."

The battery life obviously depends on how you use your smartphone but if you use your device intensively (videos, chats, games…), you should get at least a day and a half of battery life. You can double your battery life with moderate usage!

4. It comes with a great camera
Generally, mid-range devices don’t stand out because of their cameras. Everything taken into consideration, the A3’s camera is great. Of course, it doesn’t have the same potential the high-end devices have but it still allows you to take high-quality images with the 13 megapixel camera and an f/1.9 aperture.

Sometimes you have to take your time taking a photo in order to get the best lighting but on the whole, the photos are good and details are captured well. When lighting isn’t great, the quality is affected but we were satisfied with the results for a camera in this range.

samsung galaxy a3

5. Its design and finish is worthy of the Samsung Galaxy S7
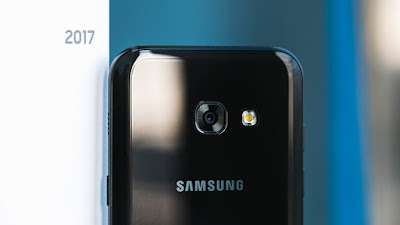
The Samsung Galaxy S7 was the design inspiration for the A3 and A5, that much is obvious. The Galaxy S7 is a beautiful smartphone and this new A3 is just as elegant. The finishes are perfect, the handling is excellent, it’s a visual delight… The brushed casing is as close to perfection as you can manage - even the camera lens barely protrudes. However, while we’re talking about the back of the phone, it's important to point out that it has a glass cover.

On the front, on the Home button, Samsung has placed a fingerprint scanner. On the right hand side, there is a SIM card and microSD card slot. Samsung is therefore offering us more than ever on a device designed for the mid-range market.

Are you considering buying the Samsung A3 (2017)? Do you think is it still too expensive for a mid-range device? Let us know in the comments below.

Enter your email address:


Delivered by FeedBurner
Read More »